ACLClouds Documentation
Welcome to the official documentation. Find here all the guides for managing your services: game servers, Discord bots and VPS.
What is ACLClouds?
ACLClouds is a premium cloud infrastructure designed for developers, gamers and creators. Our servers are hosted in France with minimal latency and guaranteed 99.9% availability.
Our services
| Service | Description | from |
|---|---|---|
| Games | FiveM, Minecraft, Rust, ARK, Valheim, Garry's Mod | Free |
| Bots | Node.js, Python, Go, Rust, Java, C# | Free |
| VPS | AMD EPYC, NVMe Gen4, full root access | 10€/month |
Quick start
Create and configure your first service in less than 5 minutes.
Create an account
Registration
Go to the customer area and create your account with your email address.
Choose a service
Select the service that meets your needs: Games, Bots or VPS.
Configure
Follow the setup wizard. Your service is ready in less than 60 seconds.
Access the panel
Connect to your management panel to administer your service.
Game Servers
Host your game servers with optimal performance and simplified management.
Games available
| Game | Slots | Mods | Price |
|---|---|---|---|
| FiveM | 32 à 256 | ESX, QBcore, OneSync | 14.99€/month |
| Minecraft | 4 à 100+ | Forge, Paper, Spigot | Free / €4.99 |
| Rust | 50 à 500 | Oxide, uMod | 19.99€/month |
| ARK | 20 à 200 | Cluster, Cross-play | 16.99€/month |
| Valheim | 4 à 50 | BepInEx | 12.99€/month |
| Garry's Mod | 16 à 128 | DarkRP, Workshop | 9.99€/month |
Features included
- Automatic 10 Tbps DDoS protection
- Daily automatic backups
- Automatic restart in case of crash
- Real-time console via the panel
- Integrated file management (online editor)
- Task Scheduler (wipes, restarts)
- Free subdomain included
- SFTP access for file transfer
Pterodactyl Panel
Manage your game servers from an intuitive web interface.
Access to the panel
Your Pterodactyl panel is accessible at the address provided when creating your service. Log in with your ACLClouds credentials.
https://panel.aclclouds.com
Panel features
- Start / Stop / Restart the server in 1 click
- Real-time interactive console
- File manager with code editor
- MySQL database management
- Automated Task Scheduler
- Management of sub-users with permissions
- Live CPU, RAM, Network Stats
- Secure SFTP access
FiveM
Configure your GTA V Roleplay server with ESX or QBcore.
Basic setup
After creating your server, edit the fileserver.cfgfrom the panel file manager.
sv_hostname “My FiveM Server”
sv_maxclients 64
sv_licenseKey "your_key_cfx"
onesyncwe
set steam_webApiKey "your_steam_key"
Install ESX
Download ESX
Download the latest version of ESX from GitHub and upload it via SFTP to the folderresources/.
Import database
Import the SQL file from ESX into your MySQL database via phpMyAdmin.
Configure server.cfg
Addensure es_extendedin your server.cfg and configure the MySQL connection.

Minecraft
Complete guide to the Minecraft ACLClouds panel, based on the real dashboard screens: version, options, files, worlds, saves, Java, SFTP and administration.
Recommended path to configure a server
The easiest way is to always follow the same order. This way you avoid conflicts between the server engine, world, plugins, mods and Java version.
Choose engine and version
OpenVersionto select the server type:Vanilla, Paper, Purpur, Fabric, BlacksmithingorNeoForge. Then select the version of the game compatible with your project.
Check Java version
InSettings, adapt the Java image if your loader or pack needs it. The panel offersJava 25, 21, 17, 11and8.
Set server.properties
InOptions, configure visible name, number of players, whitelist, PvP, distances, difficulty, game mode and generation options.
Add server content
UseFilesto send your plugins, mods, datapacks, server packs or configurations. For a complete world, also useWorlds.
Create a risky pre-boot backup
Before a version change, modpack or reinstallation, create a backup inBackups. This is the cleanest return point.
Start then check
Come back toConsoleto start the server, monitor logs and fix errors. The tabInteractiveis then used for real-time actions.
What type of server to choose?
Each engine meets a different need. The right choice depends mainly on what you want to install afterwards.
| Type | Usage | Compatibility | Recommended for |
|---|---|---|---|
| Vanilla | Base game without modification | ? | Pure survival among friends |
| Paper | Optimized server | Bukkit/Spigot/Paper plugins | Public servers, SMP, mini-games |
| Purpur | More configurable fork of Paper | Paper plugins + advanced options | Custom gameplay |
| Fabric | Lightweight mod loader | Fabric Mods | Performance, QoL, modern packs |
| Blacksmithing | Historical mod loader | Forge Mods | Heavy mods and classic packs |
| NeoForge | Forge Community Evolution | NeoForge Mods | Recent Forge-oriented packs |
/mods/.What this category covers
- Consoleto start, stop, restart and read logs.
- Optionsto modify
server.propertieswithout using the file editor. - Interactivefor announcements, effects, player actions, weather, sounds, particles and game rules.
- Version & Javato change the Minecraft engine and server Java image.
- Files, WorldsandBackupsfor the entire data lifecycle.
- Administrationto share access, control actions and audit changes.
Console
The server's main screen brings together machine status, power commands, logs, and essential startup information.
What you control from the console
- Start, RestartandStopto manage power supply.
- TypeandVersionvisible in one place to quickly check your active configuration.
- Time remainingandplanto find out if the service needs to be renewed.
- Server address, number of players and general condition.
- Logsfilterable and input box to execute a command by hand.
- System Statistics: CPU, memory, disk and network traffic.
Useful commands to know
whitelist on
whitelist add Username
op Pseudo
save-all
stop
Use the console for one-off administrative commands. For more visual or quick interactions, the tabInteractiveis more suitable.
Options
The tabOptionsexposes the most important parameters ofserver.propertieswith a simple interface to register.
Screen overview
The panel groups the settings by family: banner visible in the list of servers, player settings, world, generation and network security.
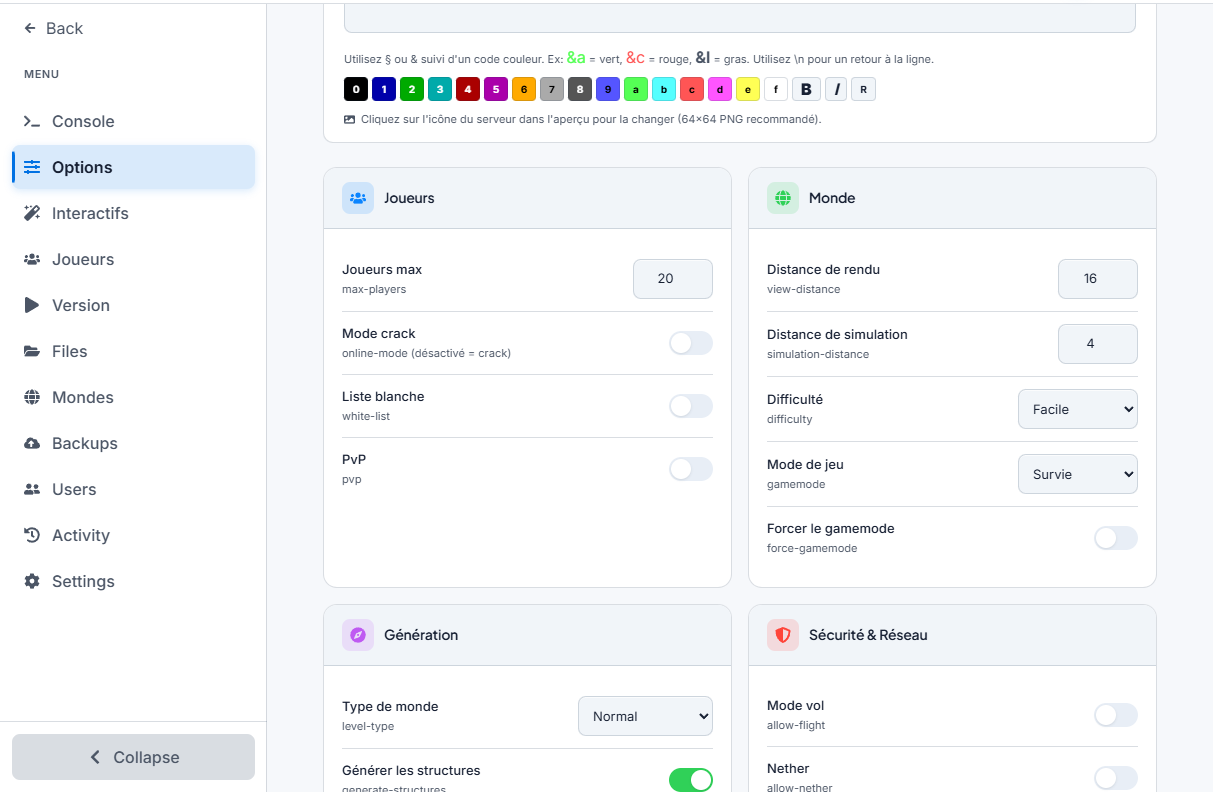
Parameters to set as a priority
| Group | Visible settings | Impact |
|---|---|---|
| Server banner | MOTD, colors, icon 64x64 | What players see in their server list |
| Players | max-players, online-mode, white-list, pvp | Access, security and entry rules |
| World | view-distance, simulation-distance, difficulty, game mode | Performance and gaming experience |
| Generation | level-type, structures, animals, monsters, NPC | Structure of the world and natural behaviors |
| Security & Network | flight, Nether, command blocks, hardcore, spawn protection | Server rules and risks of abuse |
How to properly modify these options
Make changes by logic block
Start with the accesses (online-mode, whitelist, PvP), then adjust the distances and finally the generation. This avoids mixing security and performance.
Save
Click onSavein the tab to apply the new values to the fileserver.properties.
Restart if necessary
Banner changes or certain generation settings are more reliable after a complete server restart.
online-modeTo allow non-premium accounts, at least activate the whitelist and keep strict control over operators and permissions.Interactive
This page is used for instant actions on an online server: messages, announcements, effects, weather, game modes and other administrative actions.
What the tab allows
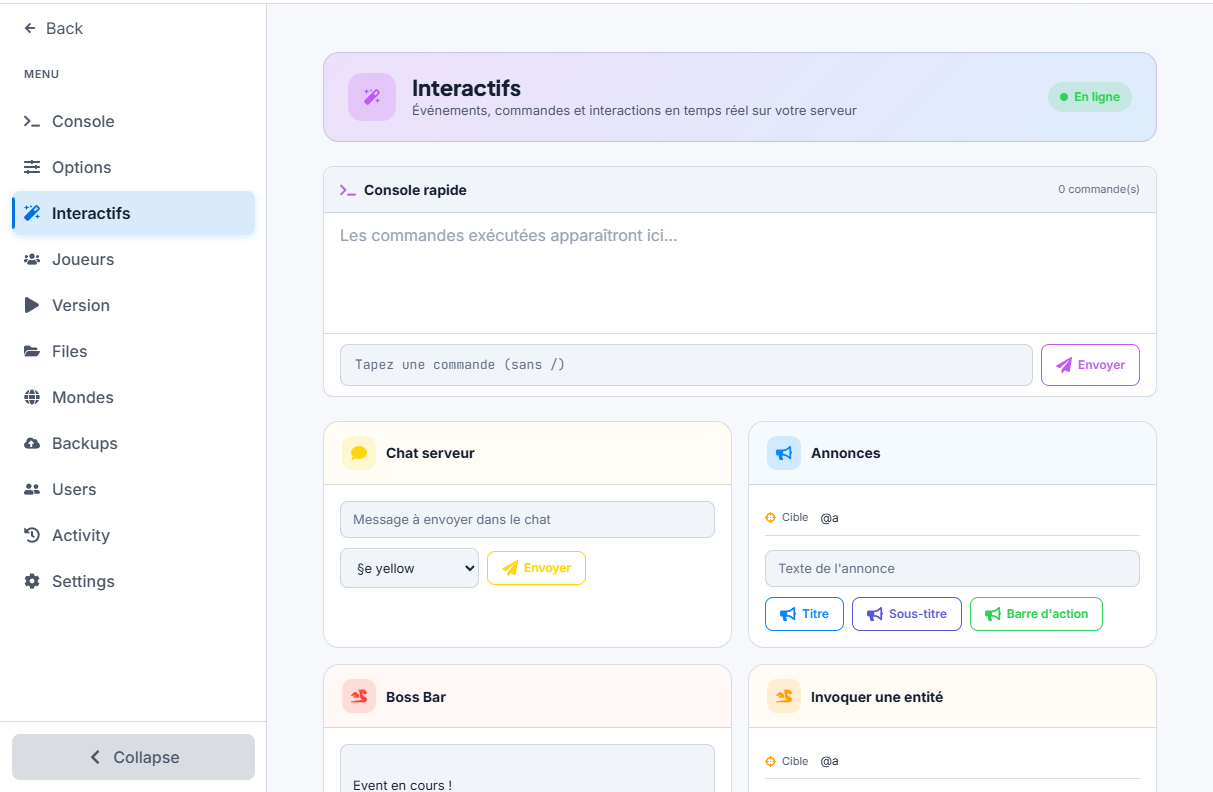
- Quick consoleto send a simple command without returning to the main console.
- Server Chatwith integrated color codes to publish a readable announcement in game.
- Announcementsin title, subtitle, action bar and boss bar.
- Summon an entity, give an itemor trigger aplayer action.
- Potion Effects, experience, soundsandparticles.
- Weather & Time, Fun & Chaos, Game rulesandGame Mode.
When to use it
UseInteractivefor live operations on players. This is the most convenient screen for an event, animation, quick test or visible maintenance without writing all the commands by hand.
Players
The pagePlayerscentralizes the monitoring of connected players. If the server is offline, the dashboard tells you explicitly.
What you need to know
- When the server isoffline, the tab displays a message inviting you to start it to see the connected ones.
- When the server isonline, use this area as a quick checkpoint for players present.
- To limit access, combine this tab withOptions (
white-list) and the console (op,whitelist add,kick).
Recommended access management
whitelist add Username
whitelist remove Username
op Pseudo
deop Nickname
For a private server, activate the whitelist before public opening. For a community server, keep a short list of operators and instead delegate tasks via a permissions plugin.
Version & Java
Two screens work together:Versionfor the Minecraft engine, thenSettingsfor the Java image actually used at startup.
Change server type and version
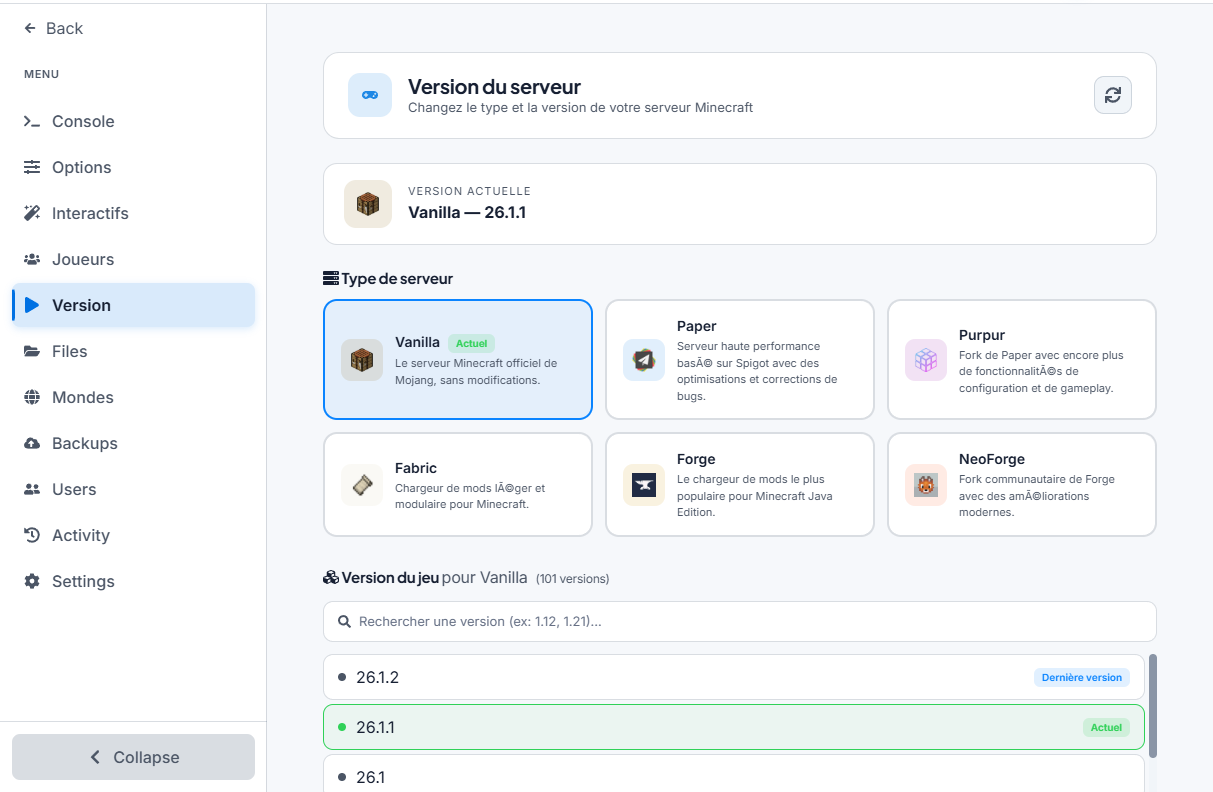
Choose the engine
InVersion, first selectVanilla, Paper, Purpur, Fabric, BlacksmithingorNeoForge.
Choose the game version
Use the search bar then click on the desired version. The panel indicates the current version and the latest version available.
Check compatibility before reboot
A change of engine often requires complete control of plugins, mods, datapacks and the existing world.
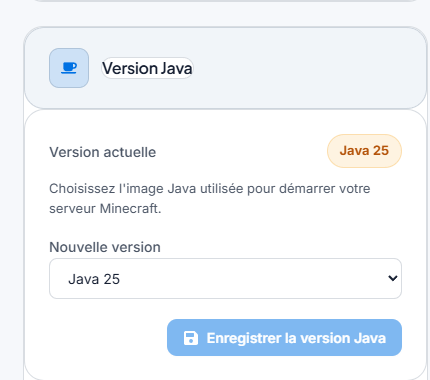
Adapt Java version
After choosing the engine, openSettings. The panel allows you to switch betweenJava 25, 21, 17, 11and8.
Plugins, Mods & Modpacks
The recommended flow always remains the same: choose the right motor inVersion, send the files toFiles, then check the loading inConsole.
Install plugins
Plugins are used withPaperorPurpur. Once the engine has been chosen:
Switch to Paper or Purpur
InVersion, choose the engine and game version compatible with your plugins.
Upload .jar files
InFiles, place each plugin in the folder/plugins/.
Start then configure
On first startup, the plugin folder is automatically created. Then modify its configuration files in/plugins/NomDuPlugin/.
Install mods
Mods require a consistent engine and, in many cases, the same client-side and server-side versions.
- Fabricfor Fabric mods.
- Blacksmithingfor Forge mods.
- NeoForgefor NeoForge mods.
Then drop the files.jarin/mods/, add the required dependencies and check the first boot in the console.
Install a modpack
Create a backup
Before any massive file replacement, create a backup inBackups.
Choosing the right loader
Check the exact pack type: Fabric, Forge, or NeoForge, then select it fromVersionwith the correct game version.
Send the pack server files
InFiles, upload the server pack archive or folders, then extract them if necessary. Only replace what needs to be replaced.
Control worlds and configs
If the pack provides a preconfigured world, import it properly before starting. Also checkeula.txt, configs and foldersmods/, config/andscripts/.
Start and read logs
The first launch should always be monitored fromConsoleto immediately spot a missing dependency or Java error.
world/datapacks/, then restart or reload the world.Files
The File Manager is the operational hub for plugins, mods, configs, worlds, archives and project imports.
Manager overview
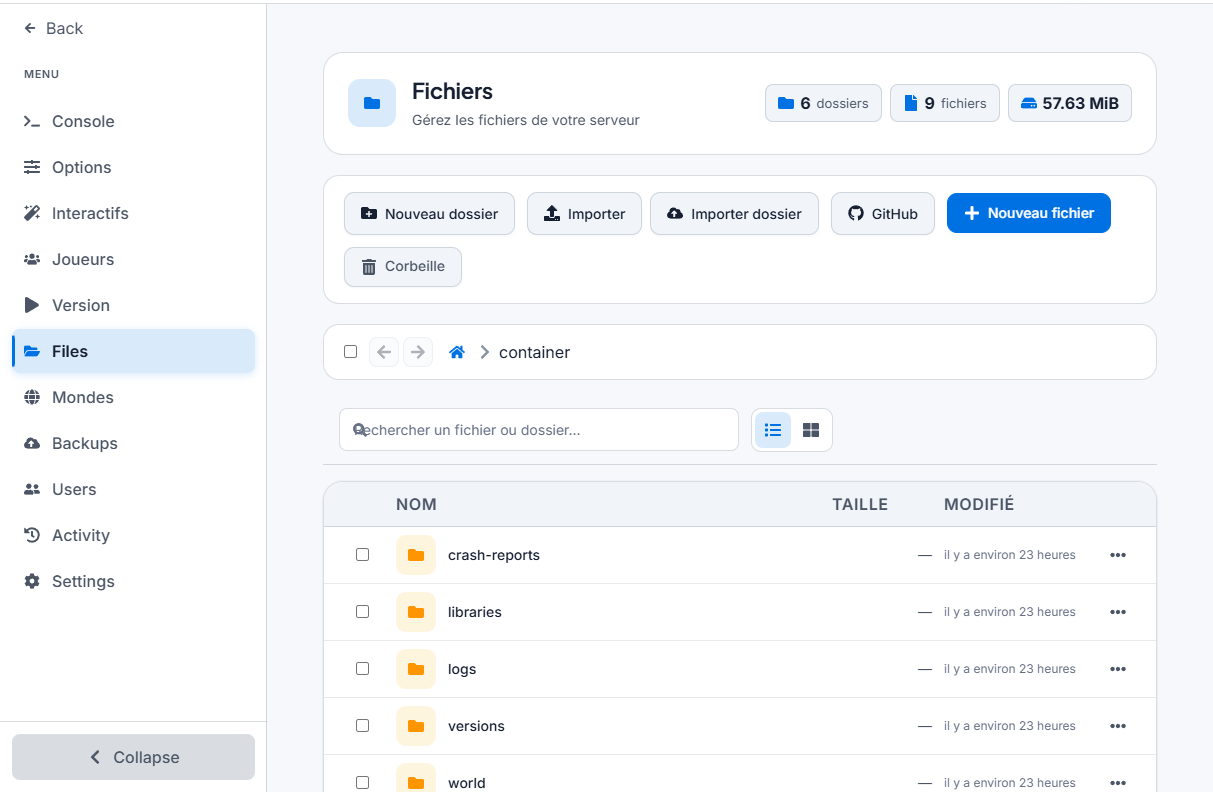
- New folderandNew fileto create a clean tree structure.
- ImportandImport folderto send local files.
- GitHubto retrieve content from a repository compatible with the panel.
- Trash, search and list/grid display for common operations.
Files and folders to know
| Path | Utility | When to touch it |
|---|---|---|
server.properties | Main server configuration | If you prefer raw editing rather than the Options tab |
eula.txt | Mojang License Acceptance | During a new installation |
world/ | Main world | Import, backup, datapacks |
plugins/ | Paper/Purpur plugins | Adding or updating plugins |
mods/ | Fabric/Forge/NeoForge Mods | Adding or removing mods |
logs/ | Startup and error history | Debugging |
ops.json | List of operators | Administrator access control |
whitelist.json | Whitelist | Private or closed servers |
server-icon.png | Server icon | Image displayed in multiplayer list |
Worlds
The tabWorldsused to import a world, download it, open its files or regenerate it properly.
Actions available
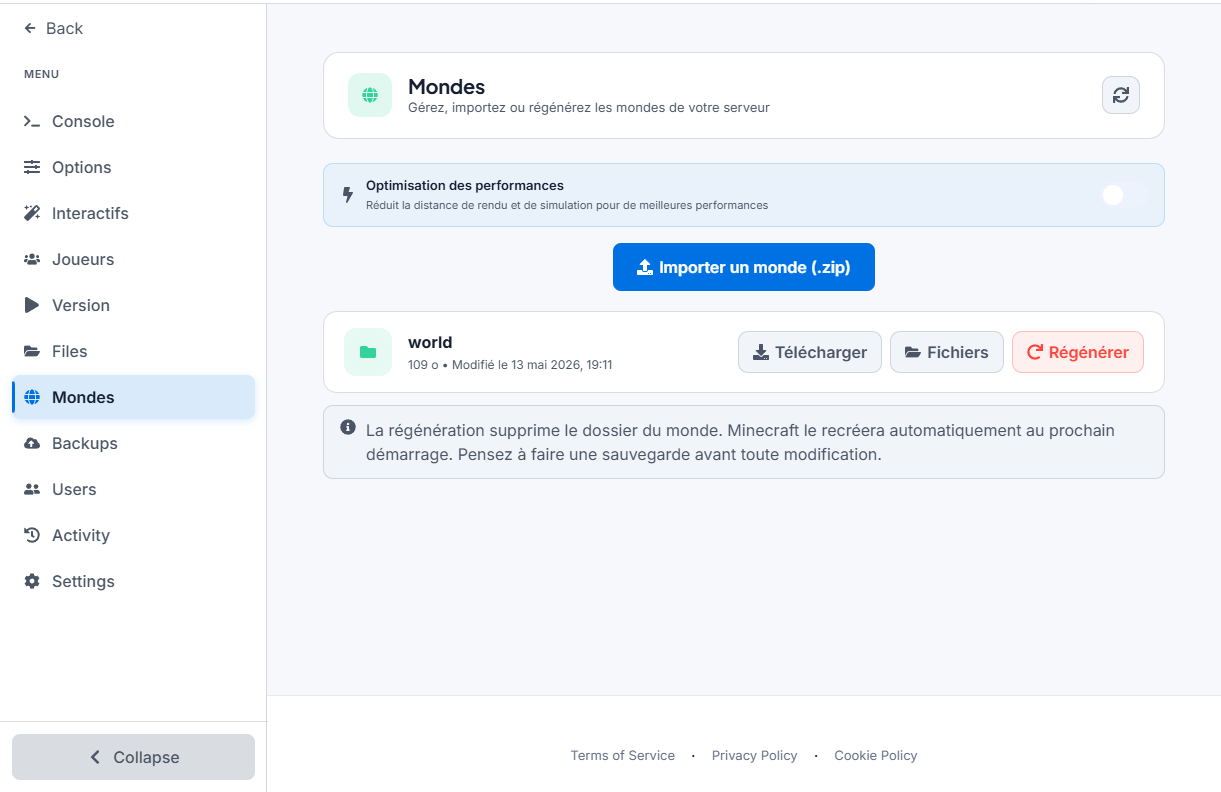
- Import a world (.zip)to replace or add a world prepared elsewhere.
- Downloadto recover the current world before a risky change.
- Filesto directly open the world folder.
- Regenerateto delete the world folder and let Minecraft recreate a clean one on the next startup.
- Performance Optimizationto reduce rendering and simulation distances.
Import an error-free world
Stop the server
Don't import a world while it's still writing to disk.
Create a backup
Always keep a point of return if the new world is not the right one or if the version differs.
Import the .zip archive
The world must contain its complete Minecraft structure. If you import a main world, then check its side folders like Nether and End if your pack depends on them.
Reboot and test
Immediately check loading logs, spawn point and dimension consistency.
Backups
The backup panel allows you to create a restore point before any risky operation: version change, large addition of mods, world import or reinstallation.
Actions available
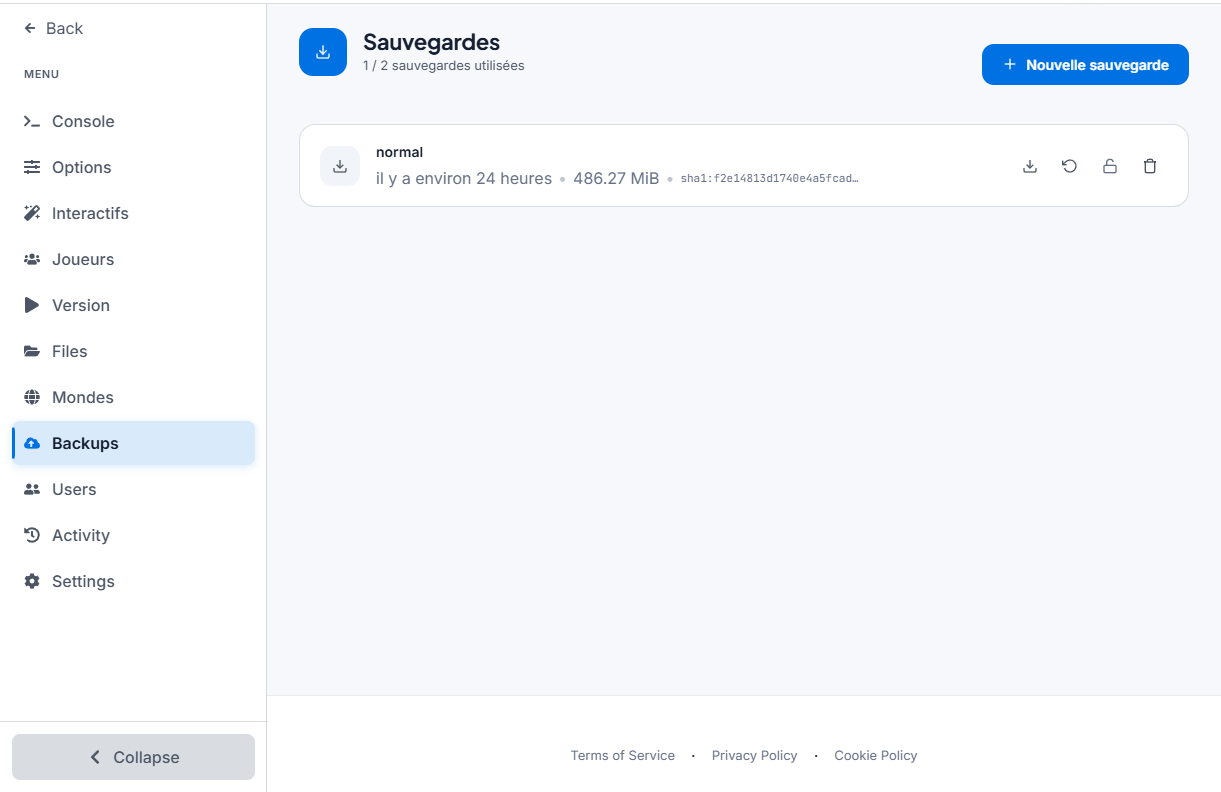
- New saveto create a manual snapshot.
- Downloadto keep a local copy.
- Restoreto return to a previous state.
- Lockto protect an important backup.
- Deleteto free up a slot if your quota is reached.
When to create a backup
- Before moving fromVanilla à Paper, Fabric, BlacksmithingorNeoForge.
- Before adding or removing multiple plugins or mods.
- Before importing a world or a complete modpack.
- Before reinstallation fromSettings.
Access & Settings
The tabSettingsbrings together SFTP access, Java version, server details and service reinstallation.
SFTP Connection
The panel provides the SFTP address, username and a quick launch link. If your account is connected via Discord, you must first set an account password before you can connect via SFTP.
Port: 2022
User: value displayed in Settings
Password: password defined in your ACLClouds account
Other useful settings
- Java version: choose the image adapted to your server.
- Server NameandServerDescription: metadata visible in the panel.
- Reinstall the server: restarts the initial installation script. This action can modify or delete files.
Administration
The pagesUsersandActivityare used to share access and audit past actions on the server.
Share access with Users
The tabUsersallows you to addsubusersto the server. Use it to delegate panel access without sharing your main account.
- Create access only for trusted collaborators.
- Share what is strictly necessary: maintenance, files, backups or monitoring.
- Remove access that becomes unnecessary after an intervention.
Audit changes with Activity
The activity log keeps the history of actions performed on the server. We see in particular file readings, downloads and restorations of backups, starts/stops, as well as version changes.
- Use it to understandwho did whatandwhen.
- Check it after a restore, incident or mishandling.
- Use it to confirm that an administrative action has been carried out.
Rust
Rust servers with Oxide/uMod and automatic wipes.
Setup
WORLD_SIZE=3500
WORLD_SEED=12345
MAX_PLAYERS=100
SERVER_NAME=“My Rust Server”
Automatic wipes
Configure automatic wipes from the panel's task scheduler. Example: wipe force every first Thursday of the month.
- Wipe map only (keeps BPs)
- Complete wipe (map + blueprints)
- Scheduled wipe with automatic in-game announcement
Create a project
Follow this step-by-step guide to create your hosting service from your dashboard.
Before you can host your project, you must first create a service on our platform. This tutorial takes you from ordering to accessing your management panel.
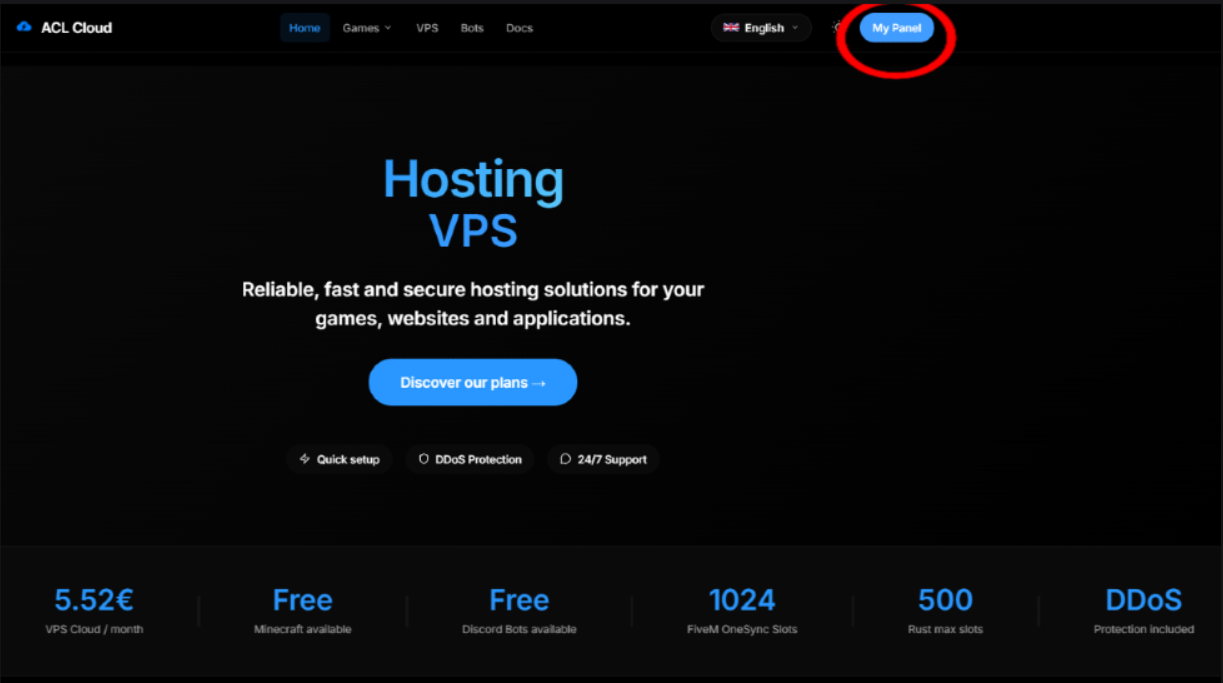
Step 1 — Access the panel
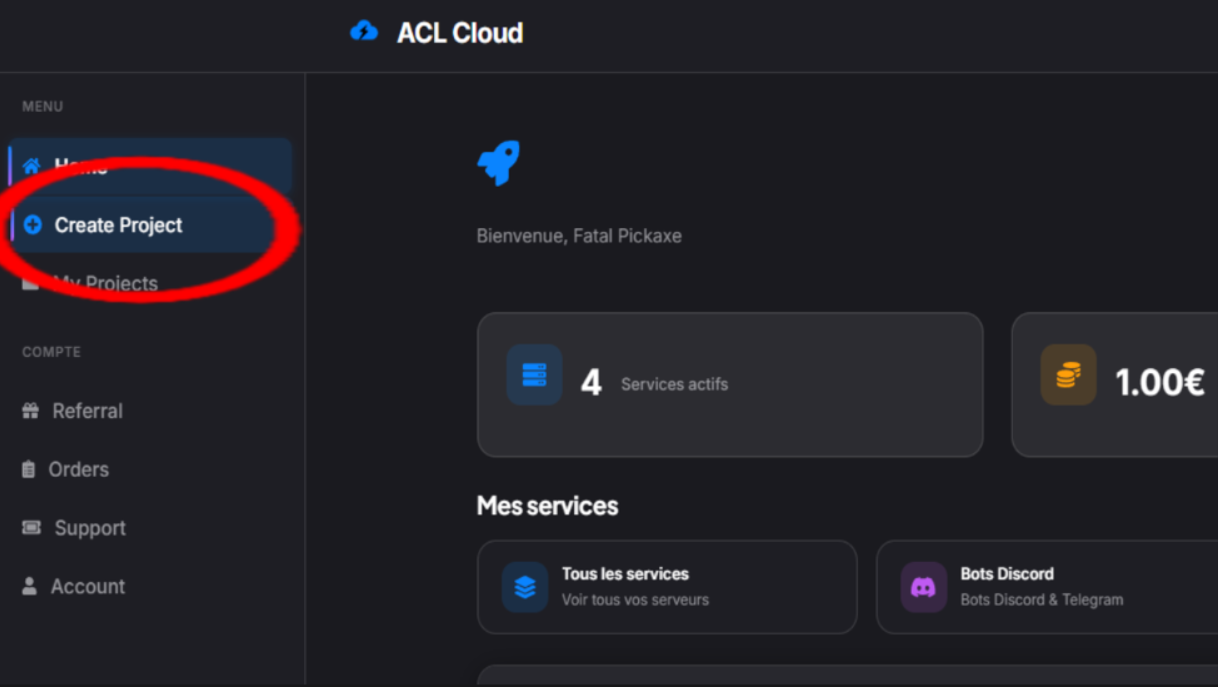
Click on “My panel”
From the home page of your customer area, click on the button“My panel”located at the top of the page. This will redirect you to your main dashboard where you can manage all of your services.
Step 2 — Order a service
Click on “Order a service”
Once on your dashboard, locate and click on the button“Order a service”. This action will open the catalog of our available offers.
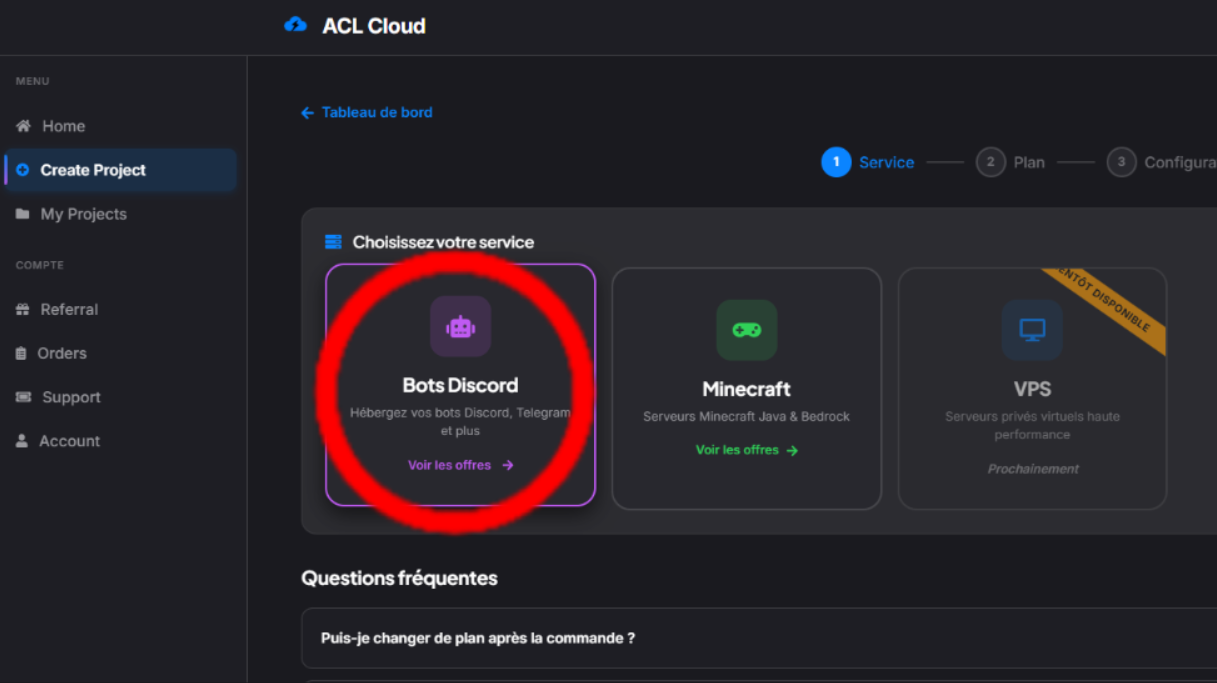
Step 3 — Select “Discord Bots”
Choose the Discord Bots category
In the service catalog, select the category“Discord Bots”. You will then access the list of hosting offers dedicated to bots and applications.
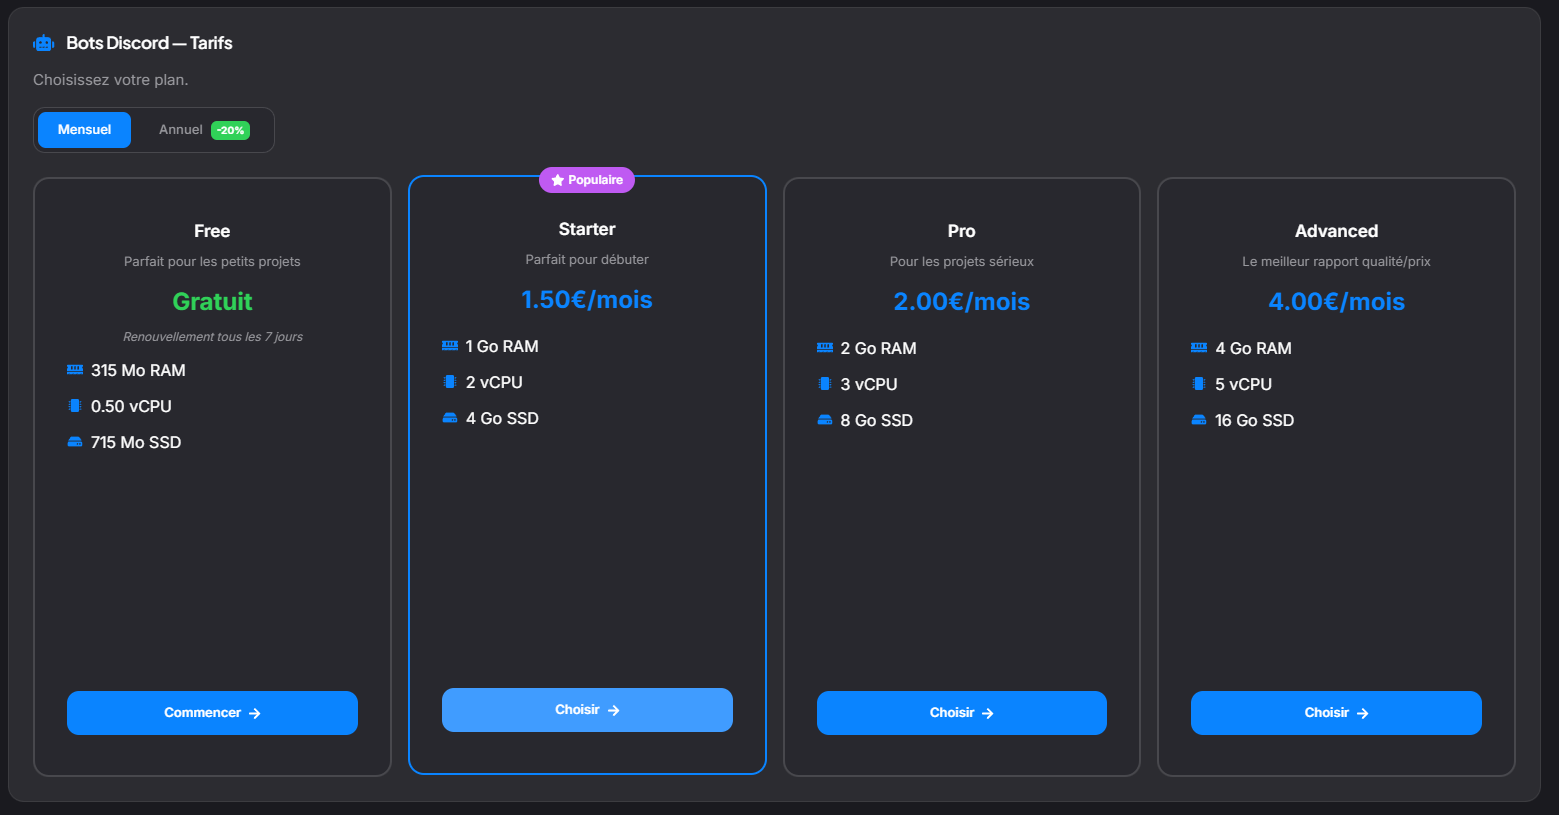
Step 4 — Choose an offer
Select the offer suited to your needs
Four offers are available:Free(free, ideal for testing),Starter, ProandAdvanced. Choose the one that best matches the resources needed for your project. You can always change your offer later.
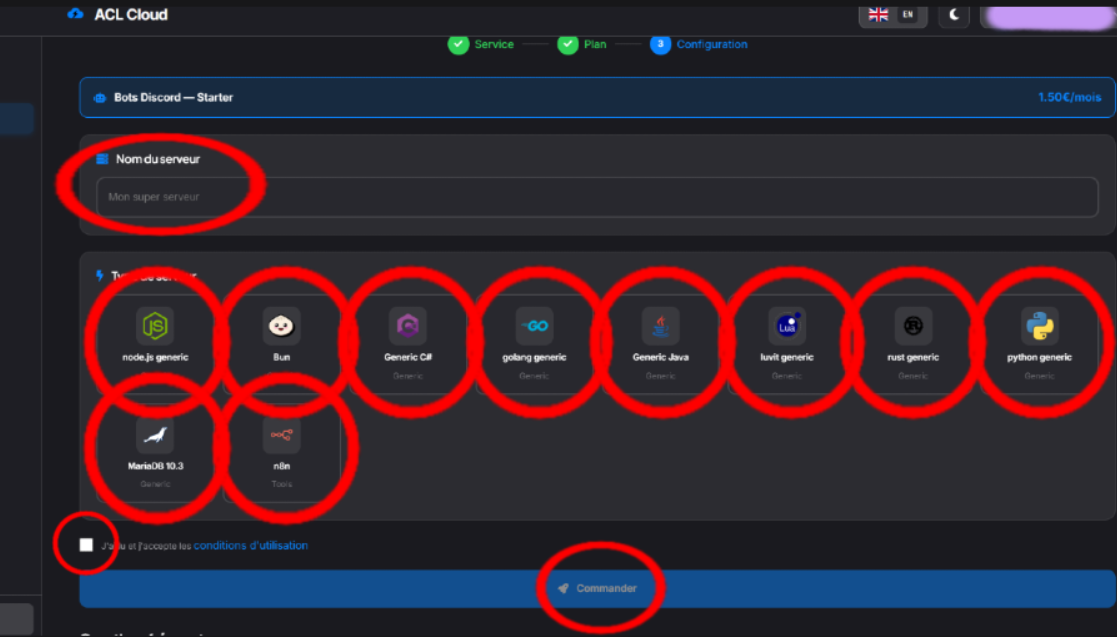
Step 5 — Configure the service
Set a name and choose server type
Give your service a name (e.g. the name of your bot or project). Then select theserver typecorresponding to your language or tool:
- Node.js— for JavaScript/TypeScript bots
- Python— for bots in Python (discord.py, etc.)
- Bun— fast and modern JavaScript runtime
- Java— for bots in Java (JDA, etc.)
- n8n— workflow automation platform
- Uptime Kuma— service monitoring tool
- And many others...
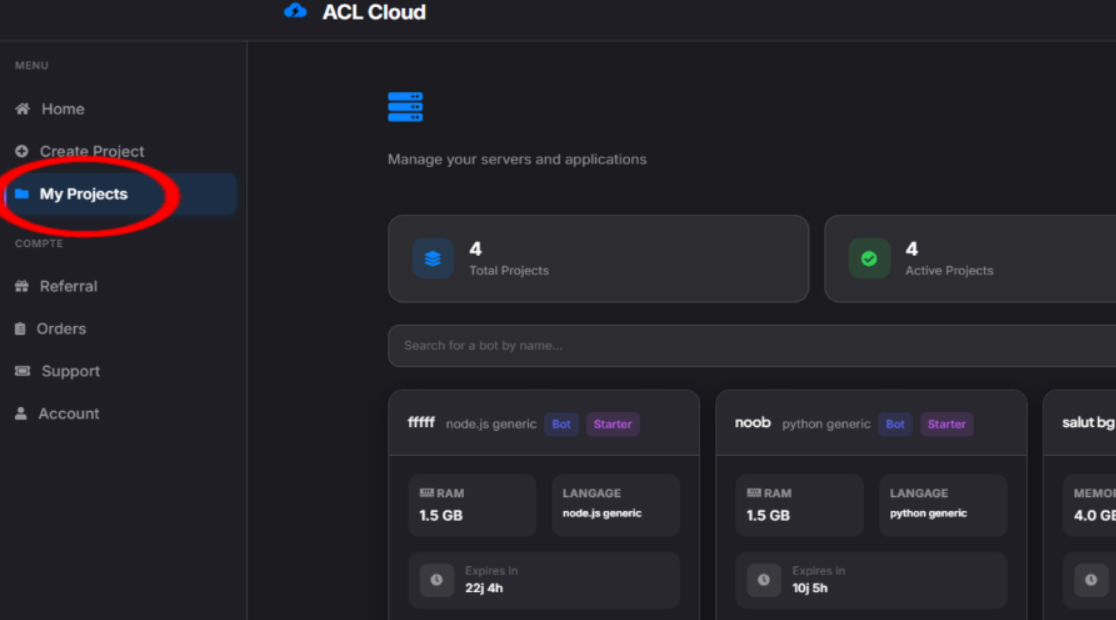
Step 6 — Access “My Services”
Go to “My Services”
Once the order is validated, go to the section“My Services”from your dashboard. There you will find the list of all your active services, including the one you have just created.
Step 7 — Manage the bot
Click on “Manage bot”
Click the button“Manage the bot”next to your service. You will be redirected to your hosting management panel, where you can upload your files, configure startup and launch your project.
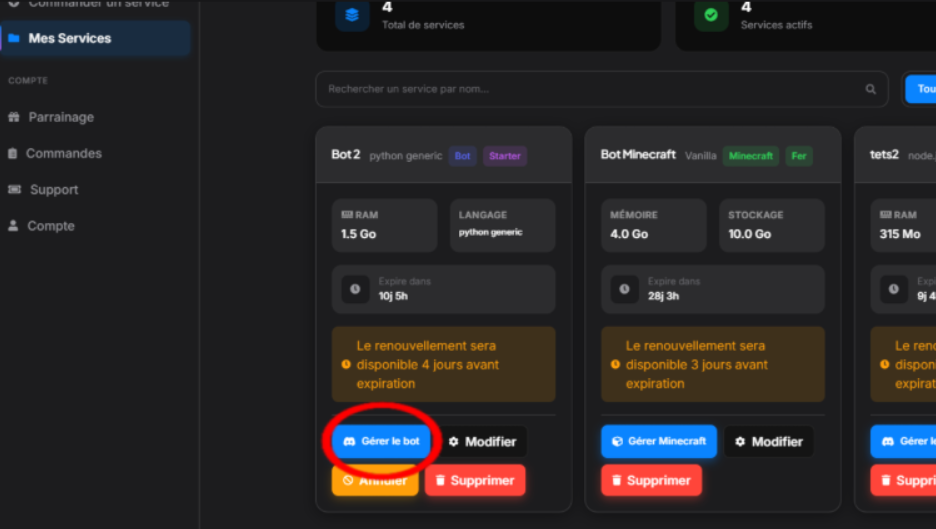
You can now import your files and configure the start of your project from the management panel.
Import my project files
Learn how to upload your code to our infrastructure
Import my project files
Start by creating a ZIP archive containing all of your source code. Don't forget to include your filepackage.json(Node.js) orrequirements.txt(Python) so that dependencies are installed automatically.
Create a ZIP archive
Select all your project files and create a ZIP archive. Be sure to includepackage.jsonorrequirements.txtat the root.
Access the file manager
Log in to your hosting panel and navigate to the tab“Files”to open the file manager.
Upload archive
Drag and drop your ZIP archive into the Web FTP file manager.
Extract the archive
Right-click on your archive and select the option“Unarchive”to extract its contents.
Configure your hosting
Configure your environment to start your project
Once your files are uploaded to our infrastructure, you need to configure your hosting to work with your code.
Configure the startup
You must tell the system which file you want to start on your hosting. It is the equivalent ofnode index.jsorpython start.py.
To do this, go to the tab“Startup”of your accommodation.
Next, set the file to start in the section“JS FILE”(for Node.js) or“PY FILE”(for Python).
Node.js? JS FILE:index.js
Python? PY FILE:main.py
If necessary, write in the section“ADDITIONAL PACKAGES”the modules necessary for the operation of your project, separating them by a space.
discord.py aiohttp python-dotenv
Renew my project
Keep your hosting active by renewing it
At ACLClouds, we've made renewing your service simple.
You must manually renew your service.
Renewal deadlines
The time you have to renew your offer depends on its billing cycle:
| Bi-weekly (2 weeks) | 4 days before due date |
| Monthly | Automatic renewal |
How to renew?
Go to your dashboard then select your server. Click the button“Renew”to renew your server.
Limitations & Rules
Discover the rules and limitations of our platform
ACLClouds provides you with a hosting service for your Discord bots. In order to guarantee optimal quality of service for all our users, certain rules and limitations apply.
Our servers operate inshared hosting, which means that multiple projects share the same hardware resources. This approach allows us to offer an accessible service while maintaining stable performance.
Types of projects accepted
We accept all types of projects: Discord bots (moderation, music, games, utilities), websites, web applications, APIs, and much more. We also offer preconfigured systems liken8n(workflow automation) andUptime Kuma(monitoring). The only condition is compliance with the rules set out below.
Discord API Request Limits
All offers are limited to3000 requests per minuteto the Discord API. However, the shared hosting of the free offer can make this limit more easily reachable during peaks of use, while the paid offers benefit from much less shared resources for better stability.
Accommodation ofself-bots is strictly prohibitedon our infrastructure. Any attempts will be automatically detected, requests will be blocked, and your account will be reported to our moderation team for appropriate sanctions.
General rules
All projects hosted on ACLClouds must comply with:
- TheTerms of Use for Third Party Servicesused (Discord, external APIs, etc.)
- Thelaws and regulations in forcewhere servers are hosted and where they are used
Any project not respecting these rules will be suspended and the associated account may be subject to sanctions.
Web Hosting
Host your websites with free SSL, Cloudflare CDN and automatic backups.
Comparison of offers
| Functionality | Starter | Personal | Pro | Performance |
|---|---|---|---|---|
| Sites | 1 | Unlimited | Unlimited | Unlimited |
| SSD storage | 1 GB | 100 GB | 250 GB | 500 GB |
| Emails | 2 | 10 | 100 | 1000 |
| Free SSL | Yes | Yes | Yes | Yes |
| Cloudflare CDN | Included | Included | Included | Included |
| Auto backups | ? | Weekly | Daily | Daily |
Domains & DNS
Configure your domain name to point to your hosting.
Point to an existing domain
Add the following DNS records to your registrar to point your domain to ACLClouds:
Type A @ -> IP provided in the panel
Type Awww ->IP provided in the panel
CNAME typeemail ->mail.aclclouds.com
Subdomains
Create unlimited subdomains from the cPanel panel. Each subdomain can point to a different folder in your hosting.
SSL & HTTPS
Secure your site with a free Let's Encrypt SSL certificate.
Enable SSL
Access the panel
Log in to your hosting panel and go to “SSL/TLS”.
Generate the certificate
Click "Install Free SSL Certificate" and select your domain.
Force HTTPS
Enable automatic HTTP to HTTPS redirection from the domain settings.
FTP & Files
Transfer and manage your files via FTP or the online manager.
FTP connection
Host: ftp.aclclouds.com
Harbor: 21 (FTP) or 22 (SFTP)
Login: your panel identifier
File: /public_html/
Folder structure
/public_html/- Root of your website/logs/- Apache access and error logs/tmp/- Temporary files/mail/- Email boxes
Databases
Create and manage your MySQL and PostgreSQL databases.
Create a database
Access phpMyAdmin
From the panel, click on “Databases” then “phpMyAdmin”.
Create the base
Click "New Database", enter a name and choose the encodingutf8mb4_unicode_ci.
Configure your app
Use the credentials provided in your configuration file.
$pdo =newPDO(
"mysql:host=localhost;dbname=my_bdd",
"user",
"password"
);
Cloud VPS
High-performance virtual servers with AMD EPYC CPU and NVMe Gen4 SSD.
Comparison of VPS offers
| Offer | vCores | RAM | NVMe SSD | Bandwidth | Price excluding tax |
|---|---|---|---|---|---|
| Offer 1 | 6 | 32 GB | 100 GB | 1 Gbps | 10€/month |
| Offer 2Recommended | 12 | 64 GB | 200 GB | 2 Gbps | 20€/month |
Included on all VPS
- Full root access
- Automatic DDoS protection
- Daily automated backup
- Unlimited traffic
- Free installation fees
- Reboot from the panel in 1 click
- Emergency KVM Console
- Dedicated IPv4 included
SSH connection
Access your VPS via SSH for complete administration.
First connection
ssh root@your_ip_vps-p 22
# With an SSH key
ssh -i ~/.ssh/my root key@your_ip_vps
Configure an SSH key (recommended)
Generate a key pair
ssh-keygen -t ed25519 -C "[email protected]"
Copy public key
ssh-copy-id root@votre_ip_vps
Disable password auth
Edit/etc/ssh/sshd_configand putPasswordAuthentication no.
OS management
Install and configure your operating system.
OS available
- Ubuntu 22.04 / 24.04 LTS
- Debian 11/12
- CentOS Stream 9
- AlmaLinux 9
- Rocky Linux 9
- Fedora 39
- ArchLinux
- Kali Linux
- Parrot OS
- Custom ISO (import your own OS)
Reinstall the OS
From the ACLClouds panel, go to “Reinstallation” and choose your OS. Reinstallation takes approximately 2 minutes. All data will be erased.
Firewall & Security
Secure your VPS with UFW and best practices.
Configure UFW (Ubuntu/Debian)
apt install ufw
ufw default deny incoming
ufw default allow outgoing
# Allow SSH, HTTP, HTTPS
ufw allow 22/tcp
ufw allow 80/tcp
ufw allow 443/tcp
ufw enable
ufw status verbose
Fail2Ban – Brute-force protection
apt install fail2ban
systemctl enable fail2ban
systemctl start fail2ban
Backups
Protect your data with automatic and manual backups.
Automatic backups
Each VPS benefits from an automatic daily backup kept for 7 days. The restoration is done in 1 click from the panel.
Manual backup with rsync
rsync -avz --progress /var/www/
user@backup-server:/backups/www/
# Local compressed backup
tar -czf backup-$(date +%Y%m%d).tar.gz /var/www/
Automate with cron
crontab -e
0 3 * * * tar -czf /backups/backup-$(date +\%Y\%m\%d).tar.gz /var/www/
Terms of Use
Find the public rules applicable to accounts, orders, hosted services, responsibilities and authorized uses on ACLClouds.
What this page covers
The conditions of use define the general framework of ACLClouds services: account creation, order, activation, reasonable use of resources, restrictions, possible suspension and user responsibilities.
- Rules for using gaming services, Discord bots and VPS.
- Obligations related to hosted content and third-party services used.
- Order Conditions, Renewal, Suspension and Termination.
- Responsibilities, limits and prohibited behaviors.
Privacy Policy
Understand what data is processed by ACLClouds, why it is processed, how long it is kept and how to exercise your rights.
What this page covers
The privacy policy details the processing of personal data: user account, contact, billing, technical logs, support, infrastructure security and legal obligations.
- Responsible for processing and means of contact.
- Data collected according to the use of the site, the panel and the services.
- Purposes, legal bases, retention periods and possible sharing.
- GDPR rights: access, rectification, deletion, opposition, portability and limitation.